Showing posts with label c#. Show all posts

Thursday, March 29, 2012

Windows Phone 7 Development Using Visual Studio 2010

with David Kelley and AppDev

Windows Phone 7 is a new step for Microsoft for the mobile platform. This course will introduce the mobile OS and how easy it is to use the.NET knowledge to create applications. The course will cover many introductory aspects of developing applications for the Windows Phone 7. For instance how XAML is used for applications and GUI designs. Also the course will cover many other aspects including controls, user input and forms, working with data, layout and Metro Controls. The course will also cover phone resources such as the Camera, GPS and many other items. To wrap up the course, the publishing the application to the marketplace and hosting of advertisements are covered.

In this course, you will learn:

* How to debug a phone application using an emulator
* About the PhoneApplicationPage and the PhoneApplicationFrame
* How layout controls are used including Grid, Canvas and Stackpanel
* Metro Basics and Phone Metro Controls
* About TextBlock, TextBox and other Form Controls
* What is touch eventing and working with events
* How MVVM (Model-View-ViewModel) works and learn how to use an asynchronous service in MVVM
* About lifecycle/tombstoning events including launching, deactivated and others
* Using media (Sound and Video) with the MediaElements and XNA Sound API's
* How to work with Bing Map Controls and Geolocation (GPS) Services

learn more at: http://www.appdev.com/prodfamily.asp?catalog%5Fname=AppDevCatalog&category%5Fname=W7DProduct&cookie%5Ftest=1#outline

Monday, December 12, 2011

Turning XAML into an image (jpg) in WP7 isolated storage and to the Phone Media Library

So one thing that has been kind a trick since the old avalon then wpf days was to be able to can a snap shot of part of the visual tree and make that an image so that you can clean up the visual tree from some xaml complexity and replace it with a plain image. I ended up trying todo with with my princess paper dolls app and found that its not as straight forward as wpf used to be but this works well enough with only a few lines of code. To start with you need to covert the UIElement root you want to turn into an image or rather a bitmap like this:

WriteableBitmap bitmap = new WriteableBitmap(480, 800);
bitmap.Render(master_03_14_2011, null);
bitmap.Invalidate();

So in this case 'master_03_14_2011' is the name of my canvas that holds the 'princess' in the app 'princess paper dolls'. Next I need to create a file name and convert the bitmap and store it to isolated storage


String FileName = String.Format("PrincessPaperDoll_{0:yyyy-MM-dd_hh-mm-ss-tt}.jpg", DateTime.Now);

var myStore = IsolatedStorageFile.GetUserStoreForApplication();
if (myStore.FileExists(FileName))
{
myStore.DeleteFile(FileName);
}
IsolatedStorageFileStream MyFileStream = myStore.CreateFile(FileName);

StreamResourceInfo sri = null;
Uri uri = new Uri("Princess;component/" + FileName, UriKind.Relative);
sri = Application.GetResourceStream(uri);
bitmap.SaveJpeg(MyFileStream, int.Parse(master_03_14_2011.Width.ToString()), int.Parse(master_03_14_2011.Height.ToString()), 0, 85);

ok so also we checked to see if the file exists before we try to write it and delete the old version. granted given how I'm creating the name its still kind of scares me to risk it. Next we do some clean up:

MyFileStream.Close();

Yes that was easy but now we need to use that stream again to get the image into the media library. First we create a stream again from the file in isolated storage.

MyFileStream = myStore.OpenFile(FileName, FileMode.Open, FileAccess.Read);
.

Now we can save it to the media library either to saved pictures or to the camera roll.

MediaLibrary library = new MediaLibrary();
Picture pic = library.SavePicture(FileName, MyFileStream);
//Picture pic = library.SavePictureToCameraRoll(FileName, MyFileStream);
MyFileStream.Close();

and some clean up and your good. unfortunately as of late there is no way to open up to the image in the media library.

Tuesday, August 30, 2011

29 Ways to make your wp7 app killer and make money

So you want a make a killer phone 7 app? make it into the top 100? well I've managed to have 3 of my apps in the top 100 and here is what I learned. Free Apps (1) are the only way to go. As a developer the best chance of success is to build a free app but further an app that is not specialized (2). That means a mass consumer focused app, such as Simon Said the game or Tools for phone 7 or Allrecipes. There are mass market consumer apps. Now an xbox title would be good but if you don't work for a game studio then you out of luck.

Now that you are building a free app that is for the mass consumer market how will you make money? Advertising (3) Advertising is the best way to make money from a free app. you add value and customer get the app for free and only a small amount of visual noise and your golden. Next you need an ad service. I recommend Microsoft AdCenter (4). Now when using the adcenter control you want to optimize its use as much as possible to not only help the adcenter target ads but mainly to get your eCPM value up which means more money. How do you do that? Once in your app ideally in OnNavigateTo do something akin to this:

(5) AdControl.TestMode = false;
(6) AdControl.Gender = Gender.Male;
(7) AdControl.PostalCode = "98104";

now you can't just set the zip code but if you have a way of extropalting that or just using Bing outright to get the zip from the geo-coordinates (8) then you can set the postal code. Also things like gender should be set ONLY if you can say your demographic is female or you KNOW they are female. Part of this is to actually get targeted ads which increases the likelihood of some one clicking an add which means higher eCPM values and further more money. In the XAML also set this value:

(9) RotationEnabled="True"

now lastly if the adservice is down then to still get some advantage put an ad behind the ad control to one of your other apps (10) or something like that. Further you can rotate those ads to more then one app (11) and then deeplink or market place link them to those apps.

One more thing about ad's is to make sure that the ad channel your using is as close to your demographic as possible. An example of this targeting would be if you app is primarily for fishermen then maybe ad's related to fishing? for example.

Now lets get back to the design, nothing is better then good UX. At the very least make sure you have some of the people you might now that are part of your target demographic and get them to use your app (12). and further 'pay attention' make it easy, make it discoverable, and use the metro aesthetic (13). So much has been done to help make that easy and using it gives you discover-ability for free. when doing metro also think simple. simple is always better for users...

Next think about analytics (14), albeit you need to do this in the end AFTER you have built your application but Microsoft covers the the cost of using an enterprise solution specifically Preemptive (the makes of Dotfuscator) to magically instrument your project. This allows you to see what users do most in your and helps you focus on further development.

Next look at a paid upgrade (15). This way if users get sick of your adds they have a place to go AND you get money. for the most part this seems to be the only reason for paid apps and that I can tell.

Next lets talk about updates. Update your application often. Each time you update your app it shows up on the latest panel in the market place which gets you more visibility (16).

Along the way a few other things might be helpful such as using live tile (17) that actually update for something related to the app. Apps with live tiles are just cooler.

Use touch and gestures, along side metro. Implementing things like 'list' with scroll and touch w/o interfering kind of thing (18). I see a lot of apps that have buttons or other 'click' or mouse like metaphors in a list box and that is not what I mean. Really this is about not using that kind of metaphor, but a touch metaphor where the list is the button based on the touch behavior, even if its just implemented using click and mouse events this can be done fairly well and users will enjoy the clean and reactive experience.

Now here is another brilliant idea... share your app and the deep link (19)... *gasp* I know it seems obvious but frequently people don't do it and I'm not sure why... what is social media for if your not going to post a few links now and then.

Also contests, enter them all (21) there are a lot of phone 7 contests and anything that gives you more exposure or better yet gives you app more exposure is bonus.

next consider your target market a bit and do some internationalization (22). For example if your dealing with formats like dates or even doubles consider the regional settings and test in them and deal with it. A case in point with floats for example is the difference between 11,5 and 11.5 which means you need to do something like this potentially:

_CurrentValue = _CurrentValue + Double.Parse(Results.Text, CultureInfo.InvariantCulture);

Another fun thing you can do that users tend to find interesting is if there is a fun easter egg in the app, a hidden feature etc (23) something fun that might even be mentioned in the app description so users know about it. Most of my apps have easter egg's.

Then there is tactile feedback (24), while there are some users that want to be able to turn this off in an application I have found that most users find it easier to know when they have done something if you use this feature. Tactile feedback can be as much as a 35 millisecond burst from the vibration motor on the phone. this might look like this:

// class or view members
private VibrateController _Vibration = VibrateController.Default;
private TimeSpan _ThisTime = new TimeSpan(0, 0, 0, 0, 30);
private Boolean TactileFeedback = true;

// called in any touch event
private void PresentTactileFeedback()
{
if (TactileFeedback)
{
_Vibration.Start(_ThisTime);
}
}

Ratings are also key to going higher in the market (25). Try putting a rate my app button or icon in the application to encourage users to 'rate' your app. In the event handler for this you might use code like this:

MarketplaceDetailTask Details = new MarketplaceDetailTask();
Details.ContentIdentifier = "29c27356-7862-e011-81d2-78e7d1fa76f8";
Details.Show();

Lastly get others that are your friends to rate the app (26) the more they rate the app the more your app shows up higher on search's based on the keywords (27) that you lovingly set in the app hub when you submitted your app. Oh yes and while your in the app hub, upload as many pictures as the market place hub will although including the background image if you ever want to be featured (28). With that happy app building. (and if you need ratings, rate mine and I'll rate yours 5 stars (29), assuming they are free or trail apps)

Wednesday, February 23, 2011

Simple Twitter Integration

A few posts ago I did a quick post on simple Facebook integration but in HTML . Twitter is even simpler and this method can be applied to Silverlight easy enough. First lets look at the HTML version:

<a href="http://twitter.com/share?url=http://www.HackingSilverlight.net&text=check out this awesome site&via=DavidJKelley"
>Tweet</a>

you can see that basically its just a hyper link to the twitter share URL but it adds 3 query string parameters namely URL , text and via. URL gets parsed into a short URL by twitter and then the text is inserted and then a note about what user it came from meaning in this case the twitter would be something to the effect of:

check out this awesome site http://t.co/nn6oQN8 via @DavidJKelley

keep in mind that users will have to login and the tweet will be posted as them.
In HTML rendered the above code would look like this in your browser:

Tweet

now from Silverlight in C# it is about as simple with something like:

System.Windows.Browser.HtmlPage.Window.Navigate(new Uri("http://twitter.com/share?url=http://www.HackingSilverlight.net&text=check out this awesome site&via=DavidJKelley"), "_blank");

this would do effectively the same thing opening a new browser window and ask them to login to twitter and then let them post the same thing. Nice and simple :)

Tuesday, December 7, 2010

Making the MS Adcontrol REALLY work on phone 7

So you want to use ad's in your windows phone 7 apps as a revenue stream and you followed the directions and it seems like it 'may' work but alas everyone that that has your app never see's an ad and come to think of it you haven't either save the test add...? Hmmm...

You went out to this site:

https://pubcenter.microsoft.com/Login

and created an 'ad unit' and gotten an application id for your app.

you then have downloaded the phone 7 ad SDK from this link

http://advertising.microsoft.com/mobile-apps

included and referenced the ad DLL and created the xaml that looks to the effect of :

(at the top of your xaml)
xmlns:advert="clr-namespace:Microsoft.Advertising.Mobile.UI;assembly=Microsoft.Advertising.Mobile.UI"

(some where on the page)
<advert:AdControl x:Name="AdvertControl"
ApplicationId="[Guid here]" AdUnitId="[ad unit id here]"
AdModel="Contextual"
RotationEnabled="True" Width="480" Height="80"
Margin="0,-1,0,0" UseLayoutRounding="False" VerticalAlignment="Top" d:LayoutRounding="Auto"
d:LayoutOverrides="Height" >
</advert:AdControl>

you've compiled and uploaded and even went so far as to test your app using the test values they provide for the application id and ad unit id... your app is approved but your not getting any hits...

hmm... what you have over looked... oops they left out one tiny detail... at least in all the directions I have found... in your constructor or in our override onnavigateto try adding this little bit of C#...

AdControl.TestMode = false;

really? as much as it makes me tired all over... yes this is all the magic I needed todo...

Friday, December 3, 2010

Windows Phone 7 Socket Support...

or not...

if you have a dev account and or otherwise unlock your phone you can run unmanaged code... again Jeremiah does a wonderful hack with source using sockets on phone 7... don't worry this is another hack that won't get through the phone 7 market place vetting process but its fun to play with. check out Jeremiah's project here with source code:


http://groups.google.com/group/wpf-disciples/browse_thread/thread/e8f14483a41e6b0d

Thursday, November 11, 2010

Codeplex Projects Everyone Should Know About

(a guest post by Ryan Davidson and chapter 3 of Hacking Silverlight)

First of all, we should probably explain what Codeplex is. Codeplex.com is a collaborative website where individual contributors create, maintain, contribute, and share code samples for various Microsoft technologies. In this chapter, you will get a brief introduction to some of the open source tools that everyone should know about. These projects include design tools, development tools, libraries and toolkits, back-end and server-side technologies. They include samples of best practices by some of the most accomplished Silverlight users today. These projects showcase people hacking Silverlight in new and interesting ways.

It’s important to note that all of these projects are open source, created by people who have a desire to help the overall Silverlight community. If you find the projects useful, take some time to contribute, or better yet, start your own. Codeplex is waiting. First up, it’s infectious, it’s compelling, it’s the MVVM fever and it’s time for you to break out of your pedestrian design patterns.

MVVM Light Toolkit…

“MVVM is so hot right now!” Pardon the Zoolander reference, but it does seem appropriate as an introduction to MVVM due to the incredible popularity and overall buzz around the Model-View-ViewModel design pattern within the Silverlight community.

So what is MVVM? We could easily, and others already have, dedicate an entire book to answering this question, so I’ll just skim over the details and say that MVVM is a architectural pattern that helps developers create applications that are cleaner, easier to maintain and extend, and also highly testable. It’s a variation on the Model-View-Controller pattern that takes advantage of the rich data binding capabilities of Silverlight. The ultimate goal of MVVM is creating a development workflow with true separation between the user experience layer (View) and the programming or business logic layer (ViewModel). Or more simply, you can work on and test either the front end user experience or the back end logic without having to worry about what the other half is doing.

MVVM is just a pattern, all the toolkits (including MVVM Light), classes, and frameworks are just helpers to expedite your implementation of the MVVM pattern. The power of MVVM is really in the rich data binding. Let’s take a moment to look at the data binding syntax in XAML and the C# code behind with a basic TextBlock control.

<textblock text="{Binding Welcome}">

public class MainViewModel : ViewModelBase
{
public string Welcome
{
get{ return "Welcome to MVVM Light";}
}
public MainViewModel(){ }
}

What is happening is the TextBlock has a Dependency Property of a Text value. That value is bound to public Welcome property inside the MainViewModel class. This value of Welcome is determined at runtime. What this gives us is a way to determine the value of a property based on multiple inputs including, user defined preferences, resources, styles, or data binding. The beauty of data binding is that if a property changes in either the ViewModel or the View the data remains bound to the Dependency Property and will update both visibly in the View and in ViewModel data objects accordingly.

How does this binding work? There is a lot of magic that Microsoft has set up and tested for us already. All you really need to know is that you need to set up the Welcome property to use the INotifyPropertyChanged event. Then whenever the property changes it raises the property changed event to all objects bound to that property. Those objects can be set up to handle the event and update properties accordingly.

How do you bring the View and the ViewModel together? First you’re going to create a new XAML prefix in your App.xaml:

xmlns:d="http://schemas.microsoft.com/expression/blend/2008"
xmlns:vm="clr-namespace:MvvmLight2.ViewModel"

Then set up your MainViewModel as a data source within your Silverlight Application.

<application.resources>
<?xml:namespace prefix = vm />
<vm:mainviewmodel key="MainViewModel" isdatasource="True">
</vm:mainviewmodel>
</application.resources>

Then in your MainPage.xaml you can set the DataContext of your UserControl to your View Model.

<?xml:namespace prefix= [default] http://schemas.microsoft.com/winfx/2006/xaml/presentation NS = "http://schemas.microsoft.com/winfx/2006/xaml/presentation" />
>usercontrol class="MvvmLight2.MainPage" xmlns="http://schemas.microsoft.com/winfx/2006/xaml/presentation" datacontext="{Binding Main, Source={StaticResource Locator}}">
</usercontrol>

Now all the child elements of your UserControl inherit the data context of your ViewModel and can be bound do any data exposed in the ViewModel using the Binding syntax we mentioned earlier.

Another very useful benefit of MVVM is Blendability. Blendability is the ability to consume and design against your ViewModel data within Expression Blend and Visual Studio 2010 visual designer. You can use the ViewModel data to design against which can greatly inform your user experience design. The beauty of an MVVM application is that you can see your data inside Blend.

The MVVM Light Toolkit was created and is lovingly cared for by Laurent Bugnion with the ultimate goal of creating an approachable version of MVVM. I say approachable because only the most essential components are included. Don’t call it, "dumb down", it’s just streamlined. All the power is there. The goal of the MVVM Light Toolkit is to "break the monotony" of writing all the standard code and allow you to build your whole application rapidly. Another benefit of the MVVM Light toolkit is that the code works the same in WPF and Silverlight (with a few small exceptions). Plus, since this works in Silverlight it means it will work on the Windows Phone 7 as well.

The installer on Codeplex is packaged as a MSI installer. Follow the installation instructions to set up the necessary elements. Once the install is complete you can create a new Silverlight project type called MVVM and the base MVVM components will be in place ready to use.

MVVM Light Toolkit Version 3 SP1 was release in March 2010 with some great new additions including templates for the Visual Studio 2010 and Blend 4 including a Windows Phone 7 template. There are two DLLs in the install; one is called Essentials which includes RelayCommand, ViewModelBase and others including Commands, RelayCommands, Messaging and much more, the other is called Extras which has more useful elements including; EventToCommand which is a behavior (we’ll learn more about behaviors later in this chapter). EventToCommand allows you to bind any event on any framework element to any command. This removes the annoying restriction of Silverlight and WPF that required you to only bind on a Button based element’s click event.

One final note on performance, MVVM Light Tooklit, as with all open source projects is constantly being optimized. The Databinding elements that MVVM relies on have been heavily optimized by Microsoft and should have little impact on your overall application performance. This is something to consider when thinking about using MVVM for your application.

To read full installation instructions, find additional resources, and of course, download the current source code visit the Codeplex project at http://mvvmlight.codeplex.com/.
Another critical Codeplex project for developing in is the Silverlight Toolkit.

Silverlight Toolkit

User interface made awesome!

When a new version of Silverlight is released it comes with a set of included elements including controls, templates, themes, samples, etc. The Silverlight Toolkit is an open source project sponsored by the Microsoft Silverlight product team where developers can contribute, enhance, and ultimately use the hottest new controls in Silverlight without having to wait for the next version of Silverlight to be released.

One of the most valuable aspects of the Silverlight Toolkit is the iterative development model. Controls are developed over time and constantly receive valuable feedback from the community. As controls are developed they fall into one of four Quality Bands: Mature/SDK, Stable, Preview, and Experimental. These controls can make creating otherwise tricky or cumbersome user interface elements a snap. The tools have been created in response to a need for a common set of user interface scenarios. Rather than hacking together a user control from scratch by yourself, this project puts the community to work for you.
In addition to helping to create great functionality with controls, you have to make things look good. You knew that right? Anyway, that leads me to another very powerful feature of the Silverlight Toolkit controls, themes. Themes are the visual styles that you can apply to any control. If your application has a certain look and feel, or you have some brand guidelines you have to follow, you can use one of the included themes or break it open and modify it to match. Once your theme is created you can save it as a resource and apply it to everything inside your Silverlight application with a few clicks in Blend. Yeah, it’s that powerful.

Getting started with the Silverlight Toolkit is easy. You download a single Windows Installer package, which does all the heavy lifting for you. It will install all the components on your system so you can get started right away using the new controls and themes in Blend or Visual Studio.

Open up a new project in Expression Blend 3 and under the Assets tab you’ll see a list of new Controls that you can use.


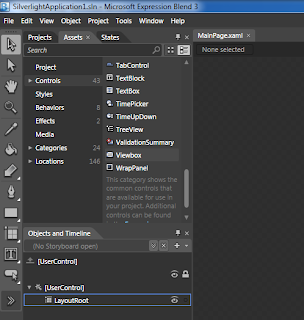
Figure 3.1A – Toolkit in Blend

You can learn more about Silverlight Toolkit and the controls included at
http://www.codeplex.com/Silverlight.

Now that you have your interface data bound and stylized, it’s time to explore how we can use those control elements to present content with the Silverlight Media Framework.

Silverlight Media Framework

Have media, we’ll serve! The Silverlight Media Framework (SMF) gives media producers all the tools they’ll need to serve up amazing quality content using Silverlight and IIS Smooth Streaming.

As bandwidth pipes open up and high speed internet connections proliferate more and more users expect the highest quality content delivered quickly wherever they are. In the past that was a Catch 22. You couldn’t deliver high quality content without your user having to wait for lengthy downloads or you could get your content quickly but at a lower quality. Those days are gone. With IIS Smooth Streaming the server knows how fast the connection is and scales the quality of your content accordingly. It’s such a simple idea but it has taken years to finally hit the main stream.

What SMF offers you is a complete set of tools to prepare, encode, and deliver your content anywhere using Silverlight. SMF is still in its infancy, but it already has some very high profile implementations including the 2010 Vancouver Winter Olympics. Smooth Streaming alone not enough to convince you to use Silverlight? Well, Smooth Streaming is just one of the multiple tools included in SMF. There are also DVR type controls, logging, with future releases planning to implement advertising, improved API, better plug-in support and improved accessibility. The future is bright, and in full HD.

The download has all of the necessary DLLs which you’ll need to include in your project solution as resources. In addition, you’ll need to download and install the IIS Smooth Streaming Player Development Kit for everything to work properly. Once you have things set up you can take your content and stream it to the world. You can learn more at http://smf.codeplex.com/.

Sometimes just serving up high quality video isn’t enough. Lets take a look at how the Silverlight Hyper Video Player is pushing video into the future.

Silverlight Hyper Video Player

"Can we do for video what hyperlinks did for text?" -- Jesse Liberty
That is the question that is driving the Silverlight Hyper Video Player (SLHVP) project. There is a lot of video available on the web these days. The subject of these videos can be simple entertainment like a dog riding a skateboard or complex like a college lecture on particle physics. Wouldn’t it be great if while you were watching these videos you could learn more about what you’re seeing just by clicking, like clicking a link on a webpage?

Let’s create a quick "for instance". Say you’re watching a TED Lecture and the speaker uses a term you’re not familiar with. With the Hyper Video Player you can click on a link that shows up at that moment in the video. The link takes you to a dictionary definition of that term. Let’s say you are really enjoying the video and don’t want to pause it to look up the term. You can bookmark the link so you can return to it later. These are just two very simple potential user experiences within the Silverlight HVP.

Silverlight has impressive video play back capabilities, but this project is really about taking video to the next level. It’s adding functionality that just hasn’t existed before, and that is what Hacking Silverlight is all about. The theory behind this project is that a video can and should be ‘clickable’ like a web page. It’s just information after all. You should be able to link related content to any moment of any video to create a richer, more engaging experience for your users.

One of the best parts of the Silverlight HVP project is the training materials being developed to teach about Silverlight HVP are using Silverlight HVP to deliver it. Nothing speaks better about a technology than using it to promote itself.

So how does one go about creating content for the Silverlight HVP? First of all, you will need some video. You’ll need to set up meta data and key frames that correspond to information inside the video. Then it’s time to let the project come to life. When you play back your media you’ll notice call-outs, links, and summaries all appearing as the video plays. It’s the ultimate in enriched user experience and the potential for this technology is amazing.

Getting started is easy. Version 1 of the SLHVP project was released in March 2010. The download is a project solution with full source code. Open the project and you’re off. Visit http://silverlighthvp.codeplex.com/ to download source code and start watching some Silverlight HVP enabled mini-tutorials.

Let move away from video in Silverlight and take a look the next frontier, Silverlight games.

Farseer Physics and Physics Helper

Want to make a game? Want to use physics in that game? Enter Farseer Physics and Physics Helper, the ultimate in Silverlight physics. In the real world, just like in programming, objects have properties. Properties like mass, inertia, velocity, etc. When objects interact in the real world these properties affect each other, and what Farseer does is give you these "real world" properties inside Silverlight.

Sometimes all you want to do is have two balls bounce around the screen. Well instead of having to figure out all the complex calculations between object properties, you can plug in Farseer Physics and you’re off. Farseer physics does have one limitation, it only supports 2D. Once you use it, however, you won’t mind that it’s only 2D, trust me!
So let’s talk about Physics Helper for a moment. Physics Helper takes the Farseer Physics engine and packages the most common physics computations into Behaviors. I’ll talk more about behaviors in the Expression Blend section below. Just know that the Physics Helper is a huge time saver when building any game that requires physics. You can learn more about Physics Helper at http://physicshelper.codeplex.com/.

To apply the physics to your application you will need to set up a PhysicsControllerMain. This will let Farseer know where your "world" is. Once your "world" is created, you can add properties to it like gravity and special collisions. The best part of Physics Helper is that the all the complex math is taking place behind the scenes and you don’t have to worry about it.

PhysicsControllerMain _physicsController = LayoutRoot.GetValue(PhysicsControllerMain.PhysicsControllerProperty) as PhysicsControllerMain;

_physicsController.Simulator.Gravity = new Vector2(0, 500);

_physicsController.Collision += new PhysicsControllerMain.CollisionHandler(_physicsController_Collision);

Finally, all you have to do is register some XAML or other UI elements using the PhysicsObject. This includes them in the "world" and applies all the properties you’ve set up in your world to them.

Ellipse ball = _physicsController.PhysicsObjects["ball"].uiElement as Ellipse;

Starting to use Farseer is really easy. Many of the available downloads include simple samples. The beauty part is simple samples of physics can scale to any size project. The object forces are the same. Go to a http://www.codeplex.com/FarseerPhysics and start playing with the samples. It won’t take long before you’re building entire virtual worlds that look and function like the real world. Neo and Morpheus will be so proud!

Balder 3d

Silverlight is a very powerful platform for all sorts of content presentation experiences including games. However, Silverlight does not offer rich 3D capabilities out of the box. Integrating or creating your own 3D engine can be a serious undertaking and thankfully the Balder 3D project is breaking through 2D barriers to implement true 3D in Silverlight.
Balder was created by Einar Ingebrigtsen and is described as a "Managed Game Engine with both 2D and 3D support targeting Silverlight, XNA and OpenGL." That’s right you don’t need to use Silverlight, but currently it’s a great platform to develop games in.
You can use Balder in two ways. One, you can download the DLLs, include them in your project solution as resources and get started leveraging Balder’s core feature set right away. Two, you can download the Balder source files and get your hands dirty exploring the guts of a complete managed game engine.

Implementing the Balder engine in Silverlight is very simple. Once you have all your resources you just need to add the Execution namespace illustrated below and you Execution:Game object has the core features ready to hook up in your code behind. Inside the Execution:Game object you can add your 3D meshes, light sources, and a camera for true 3D effects.

<usercontrol class="Balder.Silverlight.SampleBrowser.Samples.Events.Mouse.Content" xmlns="http://schemas.microsoft.com/winfx/2006/xaml/presentation" x="http://schemas.microsoft.com/winfx/2006/xaml" execution="clr-namespace:Balder.Core.Execution;assembly=Balder.Core">
<grid name="LayoutRoot">
<execution:game width="800" height="600">
</grid>
</usercontrol></execution:game>

Once you’ve downloaded the DLLs you can include them as resources in your project. You can add Physics to your 2D and 3D models easily with the Farseer Physics engine which I will talk more about in the next section. Head to http://balder.codeplex.com/ to get the latest source code and see some samples in action.

The projects we’ve highlighted so far have talked about how to create rich data binding, stylized controls, rich media delivery and an outstanding game environment. Now we’re going to talk about a project that will make creating all of these easier, Behaviors!

Expression Blend – Behaviors Library

Have you ever had to develop an interface? Expression Blend is your friend. It’s a huge time saver when creating visuals for Silverlight, plus it has some incredible features to help you develop Silverlight applications faster. Besides the graphics capabilities, Blend offers a rich XAML editing view, a unique Storyboard driven animation layout, and many more features. What we’re really interested in here are the features you probably haven’t heard of. Let’s start with behaviors.

Behaviors save time, which, be honest, you don’t have enough of. This Codeplex project will introduce you to some of the most useful behaviors already included and ready to use in Expression Blend. That’s right! You just need a default install of Expression Blend to take advantage of behaviors.

If you’re one of those "afraid of code" types, Blend has your back and behaviors are your best friend. You can think of behaviors as drag and drop code. You can work in a design view and add functionality to your elements just like dragging a file from one folder to another. You want this button to start a video? Use a behavior. You want this little ball you created to bounce around the screen? Use a behavior. It’s so simple it’s scary, like some magic voodoo hamster is inside your computer making everything just work.

Do you have a specific visual effect that you’re trying to re-create and you can’t find it within Blend? Take a look at the Effects library, also part of the Codeplex project. There are lots of visual effects you can use such as motion blur, bloom, gray-scale, and more are being added all the time.

Now, conversely, let’s say you’re one of those "I need to code everything myself" types. Behaviors still give you plenty to get your hands dirty. You can build customized behaviors in Visual Studio. You can also use the Effects library as a template for creating your own custom Effects with Pixel Shaders.

The installer package available on Codeplex will put all new elements directly into your Blend Library and they will be available to use the next time you start up Blend. Now go play! http://expressionblend.codeplex.com/.

Earlier we talked about Silverlight 3d but if you’re really hard core and maybe doing a bit of XNA on the side then this might be your thing…

Silver Sprite

Speaking of play; let’s talk games! How would you like to build once, play everywhere? Silver Sprite gives XNA developers a tool set that allows them to publish their games on the web using Silverlight without making code changes to their game. This is the essence of Hacking Silverlight. With Silver Sprite you can take your code base and run it using Silverlight without having to change virtually any code. XNA is the language that Xbox and Zune games are developed in.

Getting your game prepared to run in Silverlight takes essentially only two lines of code. Create a new Silverlight project. Then add all your game resources into that project. In the Main XAML page add a game namespace which references your project and a game class object to a canvas. That’s it.

xmlns:game="clr-namespace:MyGame

<canvas>
<?xml:namespace prefix = game /><game:game1 name="game"></game:game1>
</canvas>

Believe me, being able to port games from platform to platform that easily without making code changes is the holy grail of development hacks. Every developer, including you, would much rather write code once, and be able to deploy it everywhere. It saves time, money and sanity.

Silver Sprite 3.0 is still in alpha at the time of publication, but it already gives you some great features to port your game to Silverlight. You can easily import and leverage your graphics, fonts, and other game resources simply by adding them to the Silverlight project. Silver Sprite does all the tricky work for you.

Visit the Codeplex project at http://silversprite.codeplex.com/ to download the DLLs and find examples of Silver Sprite in action.

Summary

The projects in this chapter are all great examples of making Silverlight work for you. In the truest sense, they are all Hacking Silverlight. The best thing about these projects, and Codeplex for that matter, is that everything you’ll find is open source. The best thing about open source is that there are new projects starting up constantly. These are just a few of the projects that we find useful and we think will inspire you to push Silverlight to the next level. Your next challenge is to take some time and do a Bing search, visit Silverlight community sites and blogs, and of course visit Codeplex.com. There is likely to be some impressive new projects popping up every day. Happy Hacking.

Wednesday, September 1, 2010

Once in a life time you get the chance to hire a Luminary

Industry #Luminary & #Silverlight #MVP is looking for his next role, the race is on, if u'd like to have a rock star @ your company see @WynApse author of Silverlight Cream. see http://geekswithblogs.net/TehGrumpyCoder/archive/2010/09/01/day-1-of-being-unemployed.aspx

Hiring an MVP like David Campbell is just an almost unbelievable oppertunity for a company to gain enourmous creditbiltiy as wellas a huge strategic asset. Having heard that David (not me, but Mr. Campbell) I almost chocked. I would give my eye teeth to hire some one of his calibur and there is such low chance of ever being able to hire some one like him. In any case it will be interesting to see what company gets him first :)

some more about David Campbell:

http://www.silverlightcream.com/

http://wsinsiders.com/the-silverlight-mvp/

http://geekswithblogs.net/TehGrumpyCoder/archive/2010/09/01/day-1-of-being-unemployed.aspx

http://www.wynapse.com/

http://twitter.com/WynApse/

Tuesday, August 24, 2010

Getting the Root Visual in Phone7

ok, so this should have been easy for me but for some reason it took a half hour to figure it out so I figure it must be something that some one else might struggle just in case. That being the case if you are in some nested set of user controls and need to get a reference to the top level of your phone 7 UI here is the code:

PhoneApplicationFrame Temp = Application.Current.RootVisual as PhoneApplicationFrame;
MainPage TheUI = Temp.Content as MainPage;

now main page is the loaded PhoneApplicationPage is this could change pending your code and further 'TheUI' is something I made up but all things the same the reference to TheUI would then allow you to call any instances of the root visual. and the best part is this is admittedly a bit hacky... :)

Friday, June 4, 2010

Isolated Storage Made Easy

In its most simple form Isolated Storage allows you to save name value pairs and retrieve them at some other time the next time your app runs. Granted we could get into XML and text files etc but I'm going to stick with just name value pairs. Lets take a look at this line:

private void PresistKeyValue(string _Key, string _Value)
{
StreamWriter MyWriter = new StreamWriter(new IsolatedStorageFileStream(_Key, FileMode.Create, IsolatedStorageFile.GetUserStoreForApplication()));
MyWriter.Write(_Value);
MyWriter.Close();
}

Nice and simple. using this block we can use a line like this:

PresistKeyValue("foobarkey", "blah blah blah");

this like saves a key falue of 'foobarkey' with the 'blah blah blah' as the 'value'

Now then to get the data you need a block like this:
private string ReturnKey(string _Key)
{
string Output = String.Empty;

StreamReader sr = new StreamReader(new IsolatedStorageFileStream(_Key, FileMode.Open, IsolatedStorageFile.GetUserStoreForApplication()));

string ALine = String.Empty;
while ((ALine = sr.ReadLine()) != null)
{
Output += ALine;
}

return Output;
}

Yes a little simple but you should be able to lift both of these functions directly and use the code as such like this to regtrieve values:

string SomeValue = ReturnKey("foobarkey");

nice and simple.

Monday, May 17, 2010

MEF (Microsoft Extensibility Framework) made simple (ish)

Microsoft Extensibility Framework or MEF is one of the great features in Silverlight, designed around making Silverlight applications more extensible generally and provides a much more complete story for the separation of concerns. MEF then begs the question 'Why we care?' and 'What can MEF really do?' and we will address that here.

Let us talk about a real world example for a moment.

Say you are a vertical selling corporation of some kind, meaning that you sell to companies that do similar things. For example you might be selling to retail stores and your application will show their products. One of the problems is that your application will need to integrate with their CMS (Content Management System) to get product data. In Silverlight 3 your customers might need to provide a WCF Service to talk too. That WCF service they then provide has to have a certain API Signature or worse still they might need your code and need to recompile or YOU have to recompile for each customer or some other hack to make the application work.

Using MEF your customer still will need to get the data somewhere but it makes it easier on them to do this without mucking with your code. To make it work a customer can drop a 'XAP' that provides the content and your application doesn't care about WCF API signatures or other requirements that make it difficult to wire it into the existing system. Your customers can now easily extend, change or filter what and how their data gets to the application you built for their vertical.

In many ways this is like making the model of your application (speaking in the MVVM since) 'open source' and not only pulls the model out of the rest of the application into just about anything else and lets that model be manipulated by the client without rebuilding the application in any way.

Getting Started With MEF?

MEF is pretty straight forward to get started using since it is part of the Silverlight framework in these name spaces and you need to make sure you reference them at the project level.

System.ComponentModel.Composition
System.ComponentModel.Composition.Initialization

Now that we have the bits available, using MEF is as easy as Importing, Exporting and maybe a little code. The main idea is to be able to code or property decorations to allow MEF to find elements either being exported or imported and tie them together. We can look at this process as being able to export the data, import the data and composing the data in an abstract way that allows the elements of this process to be abstracted from our application to a degree that it can be done externally to the application post compile. "Gah!," you say? Let's take a look at the next section and learn more about this process?

MEF'd Properties in and out of our Application

Here we will work out the basics of using MEF in our application. We can start simple by creating some properties and decorate them so that we can build out our application and have them magically set by MEF. Ok maybe it is not magic so let's focus on the properties that will be set first and see how it is done. Take a look at the following code sample:

[Import("SomeValue")]
public string SomeValue;

You can see here we have 2 lines of code. The second line is our traditional string property of some object like a string. The declaration line before it is what exposes our property to MEF and allows MEF to set it. You'll note that we use a magic string here. I know this is generally not well thought of by your standard architecture astronaut but you need to have a key value in the form of a magic string to have MEF do the data mapping unless you want to define your own import attributes which we will talk about later on. Next we can take a look at the code that sets this value.

CompositionInitializer.SatisfyImports(this);

You can see here that we are doing this programmatically and we get our data from the MEF catalog. By doing this in the constructor we allow MEF to go get our data where it is coming from and loading it and we can then use it as needed in our view. This MEF process is much like dependency injection might be used in a MVVM View. Really making this work then requires that we also have this object we are talking about in our constructor. To make this week we still need to have a simple class that exports that data in such a way as we can have some data. The following code does that.

[Export("SomeValue")]
public string SomeValue = "foobar";

Notice the export declaration in this sample. When this current assembly is running we get this data element automatically added to the catalog. Going back to the sample that included the catalog you can see that we created an instance and added the current application running as our package. Once we have added a package to our catalog we can then create a container that using the container we can then ask MEF to match the elements together to do our 'binding' So how then do we make this a two way street or deal with larger collections?

Making our Properties a 2 way Street

A popular construct in Silverlight and in the XAML world altogether is the ObservableCollection. ObservableCollections allow us to do lots of things but let us focus on the fact that it is a bindable collection of data that we want to be populated by MEF. Now take a look at the following lines that show a declaration and a collection property of come class.

[Export("SomeStuffs")]
public string Stuff1 = "blah1, blah";

[Export("SomeStuffs")]
public string Stuff2 = "blah2, blah";

[ImportMany("SomeStuffs", AllowRecomposition = true)]
public ObservableCollection SomeStuffs { get; set; }

As you can see this looks mostly like the first property we looked at earlier but here we are creating an observablecollection. The ImportMany declaration above it he collection allows the multiple element collection to come through and by also setting 'AllowRecomposition' the property can then be set over and over again by MEF. From this standpoint point we are ready to really build something separate from our application.

Exporting a Class in a Separate Xap

To create a Xap we can use a standard Silverlight project that we add to our solution. Since we are going to load the xap we can get rid of the classes (x and y). Create a class called z and make it look like this code:

public class SomeClass
{
[Export("SomeValue")]
public string SomeValue = "foobar3";
}

In this class you can see we create a class with 4 properties and use export to the same key name. This creates the effect of the values being exported to the MEF catalog as a collection that will get associated with the collection we created in the last section. For this to work we need to make sure that our Xap is referenced in our first app.

Downloading Xap Dynamically

Now that we have our collection and a new xap with a class that exports values we want we can look at importing the Xap and using MEF to wire that up to the data we need. Take a look at the following code:

[Import("SomeValue", AllowRecomposition=true)]
public string SomeValue;

DeploymentCatalog catalog = new DeploymentCatalog("MEFModel.xap");

// in constructor:
CompositionInitializer.SatisfyImports(this);

catalog.DownloadCompleted += new EventHandler(catalog_DownloadCompleted);
catalog.DownloadAsync();


void catalog_DownloadCompleted(object sender, System.ComponentModel.AsyncCompletedEventArgs e)
{
// some code...
}

This code can be added to the constructor of our application just after the call to AddPackage. You can see that we pass a Relative URI to our other Xap and that we add it to the package when it loads. This can also be an event handler to to the load. In this case we get the content added to the package and it gets wired up based on the name key values that we have set by the ImportMany and Export declarations. Now the cool thing is that we don't need to keep this in the constructor. We can call this same 'DownloadPackageAsync' from any event handler or other block of code that we need. We could use this to load content dynamically pending on certain conditions such as localization.

This is all wonderful but there is one problem with using a separate Xap that has the MEF bits in it. This means that both Xaps have MEF and now ours Xaps are twice blotted from MEF using more memory then needed. Fortunately there is way around this is to set the additional Xaps to use include this in the build. In Visual Studio in the other projects find the Library reference to the MEF and right click and select properties. On the reference property pain there is a property called 'Copy Local' and we need to set this to false. This way only one copy of the MEF bits will be in the overall application saving Xap size by not blotting all the Xaps with the same bits.

Monday, May 3, 2010

Launching a URL from an OOB Silverlight Application

So I'm working on this code browser mostly to help me with my fading memory. In the app I want to be able to launch a url. So I do my normal thing and put a line of code that looks like this:

System.Windows.Browser.HtmlPage.Window.Navigate(new Uri(ThisURI), "_blank");

I was agast when I realized that this didn't work, for that matter it didn't even blow... grr... but with a bit of research I found that the hyper link button worked so a ended up making a little class like this:

public class MyHyperLink : HyperlinkButton
{
public MyHyperLink(string navigateUri)
{
base.NavigateUri = new Uri(navigateUri);
TargetName = "_blank";
base.OnClick();
}
}

even better the code to make this works looks like this:

MyHyperLink button = new MyHyperLink("some url here...");

Friday, March 12, 2010

Dirty Dirty Silverlight Hack... - Silverlight 4 Hack: Use Native/Desktop CLR Without COM Registration

Here is a hack of the month. Jeremiah is probably my favoriate Silverlight Prodagy and he has done it again with this wonderful hack, 'Use Native/Desktop CLR Without COM Registration' I like the first line, "WARNING: Information and code here can easily be abused. Please do not use it as a crutch in application planning, but more for utter despair or experimentation. Thus I wrote this blog post from that perspective."

Certainly Jeremiah's code can be abused but what is really interesting to me is how this is one more way to push the limits of what Silverlight can do. 'Hacking' doesn't have to be evil but can be just that pushing the limits and making things better. With that commentary here is the first paragraph and sample code from his article and for the rest you will have to go read his post:

Silverlight 4 + OOB + Elevated Trust gives us the ability to use COM. That would be extremely useful (vs. really useful), except we cannot use just any COM class. It has to support IDispatch (COM automation). It also has to have a ProgID associated to it. That leaves you still with quite a few built-in COM objects to work with, as Justin document's quite well here. What about running our own native or .NET code? One would have to register a COM object first, which requires administrator rights. That’s no fun for an end user! Optimally, it would be nice to be able to add your desktop CLR objects as resources to your XAP, and from Silverlight code, be able to instantiate and use your Desktop .NET classes. This is a hack to do just that.

Huh? What does the hack do?
Let me explain it in code.

/* Create our Desktop .NET helper */
dynamic fullDotNetProxy = fullDotNetProxy = ComAutomationFactory.CreateObject("ClrProxy");

/* Have our .NET helper load up our .NET assembly we extracted from our SL app resources */
dynamic assembly = fullDotNetProxy.GetAssembly(m_assembliesPath + "\\Inject.Test.dll");

/* Get our .NET Type */
dynamic testClassType = fullDotNetProxy.GetDotNetType(assembly, " Inject.Test.TestClass");

/* Create an object instance of our .NET type */
m_testClass = fullDotNetProxy.CreateInstance(testClassType);

/* Run our RunMe method on our .NET object */
m_testClass.RunMe();


Read the rest at:

http://jmorrill.hjtcentral.com/Home/tabid/428/EntryId/442/Silverlight-4-Hack-Use-Native-Desktop-CLR-Without-COM-Registration.aspx

Friday, January 22, 2010

Lunch With Interact - MVVM Made Easy

We did a cool video pod cast on MVVM Made Easy. Had Erik Mork, Fabio Matsui and Jeremiah Morrill and we talked about MVVM and MVVM made easy and did a demo showing how to build an MVVM using this simple approach for an application in Silverlight.

http://www.vimeo.com/8915487

check it out for more info...

Monday, January 4, 2010

Asynchronous Image Loading in Silverlight

So one task that was bugging me today was doing image loading asynchronously so as to not drag the app down. Now there are some 'xaml' ways of doing this in wpf and supposedly in SL but alas I have not seem it work well. I'm working on a larger class that does this better but here is the basics of how I got it to work in C# code... to start with lets take a look at the following code:


WebClient client = new WebClient();
client.OpenReadCompleted += new OpenReadCompletedEventHandler(wc_OpenReadCompleted);

if (ImagePath.IndexOf("http") < 0)
{
string URL = System.Windows.Browser.HtmlPage.Document.DocumentUri.AbsoluteUri;
ImagePath = URL.Substring(0, URL.LastIndexOf('/')) + "/" + ImagePath;
}

client.OpenReadAsync(new Uri(ImagePath, UriKind.RelativeOrAbsolute), ImagePath);

this code lived in the constructor of the class I made. Basically its a user control that replaces the image tag so I can use it in Xaml or programatically etc. in this case I needed to use it programmatically to generate this image 'effect' that I was working on so I passed it into the constructor. the key to the code above is it creates a web client, then checks the url and finally calls the async method that loads the image.

the next bit of code is the event handler:

void wc_OpenReadCompleted(object sender, OpenReadCompletedEventArgs e)
{
try
{
BitmapImage ImageToLoad = new BitmapImage();
ImageToLoad.SetSource(e.Result as Stream);
TargetImage.Source = ImageToLoad;
}
catch (Exception)
{ }
}

this code is simple enough. Basically the BitmapImage is created and we load the result as a stream into it and then use that to set the source on an image. At least for me this seemed to work well. I'll probably add a few other features namely some reference counting so when I load 1000 of these it doesn't try to grab them all at once...

Monday, December 7, 2009

Hacking the Silverlight Xap file

Every now and then I find I need to pull resources out of a Xap file. One of the issues with this is knowing what’s in the XAP. There have been a number of solutions I’ve used over the years (ok that is like 2.5 ish years) like having an index file either a Csv or Xml etc. A few weeks ago I ran across this little class that some guys were talking about on the Silverlight Insiders/MVP thread called un-zipper found here:

http://www.sharpgis.net/post/2009/04/21/REALLY-small-unzip-utility-for-Silverlight.aspx

What is cool about this class is it makes getting the assets out of a zap even if you don’t know what is in the xap up front easy and straight forward. From a using standpoint you basically need to create a webclient and a call and use the Unzipper to run through the contents. The Unzipper class deals with mucking up what is in the xap so all you need to-do is run through the collection and pull out what you need… Let us take a look at what you need to-do:
Assuming you have the Unzipper class (download here) you need the following libraries:

using System.Collections.ObjectModel;
using System.Net;
using System.Windows.Controls;

From here we need to create a web client

WebClient wc = new WebClient();
wc.OpenReadCompleted += new OpenReadCompletedEventHandler(wc_OpenReadCompleted);
wc.OpenReadAsync(new Uri("HackingXaps.xap", UriKind.RelativeOrAbsolute));


In this code we create the WebClient, add a handler and run the call pointed at our xap we want to load.

void wc_OpenReadCompleted(object sender, OpenReadCompletedEventArgs e)
{
if (e.Error == null)
{
UnZipper unzip = new UnZipper(e.Result);

foreach (string filename in unzip.GetFileNamesInZip())
{
//do something with the file name…?
}
}
}

From here you can pretty much do whatever you want. Look to see this in the up coming version of the HackingSilverlight library.

Monday, September 7, 2009

Custom Events on Silverlight Controls

So this weekend my project of choice was to build a dial control. I'll post more on that later. But one cool thing I ended up doing was building a custom event on the dial control called OnPosition Changed. Typically when you use or build controls the events you use are more straight forward but this case, we have a dial so the 'mouseover' or click isn't really want you want. So what we want is when the dial moves to a position we want the 'position changed' event called.

To start with you need some custom event args as we want to pass the 'angle' of the dial to the event handler in the consuming application. So the custom event args looks like this:

public class DialEventArgs : EventArgs
{
private double angle;

public DialEventArgs(double _Angle)
{
this.angle = _Angle;
}

public double Angle
{
get
{
return angle;
}
}
}

In this case its a pretty straight forward class that drives from eventargs and we add a constructor that lets us set the angle property easily. Next we need in our control class to define the event like this:

public delegate void PositionChangeHandler (Object Sender, DialEventArgs e);

public event PositionChangeHandler PositionChangedEvent;

protected virtual void OnPositionChanged(DialEventArgs e)
{
PositionChangedEvent(this, e);
}

With this in place a consuming xaml page if they use the control will be able to set an event handler for this event. But first we need to actually call the event when the angle of the dial changes: In the method that sets the angle we have this code:


OnPositionChanged(new DialEventArgs(AngleOfRotation));

Now when you have an event handler set in xaml you get the event called at the correct time. In xaml this might look like this:

<cc:Dial x:Name="NewKnobControl" Height="100" Width="100" PositionChangedEvent="NewKnobControl_PositionChangedEvent" Minimum="45.0" Max="135" >
<cc:Dial.KnobFace>
<Grid >
<Ellipse Fill="Aquamarine" />
<Rectangle x:Name="Indicator" Height="10" Width="49" Fill="Blue" Margin="1,45,50,45" />
</Grid>
</cc:Dial.KnobFace>
</cc:Dial>

Now in the client code you need an event handler and in this case in my demo app it looks like this:

private void NewKnobControl_PositionChangedEvent(Object sender, DialEventArgs e)
{
// applicable values
double Angle = e.Angle;
}

Monday, August 3, 2009

MSDN Webcast: geekSpeak: Composite Application Development (Level 200)

Start Date: Wednesday, August 19, 2009 12:00 PM Pacific Time (US & Canada)
Duration: 60 minutes
Audience: developer

In this geekSpeak, Microsoft Most Valuable Professional (MVP) David Kelley discusses composite application development in Microsoft Silverlight and Windows Presentation Foundation (WPF). He covers the Silverlight Designer/Developer workflow, tooling, design patterns, anti-practices, and working with distributed teams. Your hosts for this geekSpeak are Glen Gordon and Mithun Dhar.

The geekSpeak webcast series brings you industry experts in a "talk-radio" format hosted by developer evangelists from Microsoft. These experts share their knowledge and experience about a particular developer technology and are ready to answer your questions in real time during the webcast. To ask a question in advance of the live webcast, or for post-show resources, be sure to visit the geekSpeak blog.

Guest Presenter: David Kelley, Senior Software Architect, IdentityMine

David Kelley is a Microsoft Most Valuable Professional (MVP) for Microsoft Silverlight, and he has been building Web-based, distributed applications for more than ten years. He is a Silverlight user experience architect at IdentityMine, and his passion is building user experiences that are elegant and easy to use. David's career highlights include a Silverlight demonstration with Bill Gates at TechEd 2008, and developing the "Entertainment Tonight" Web site for the Silverlight 1 launch and Emmy Awards. In his spare time, David is the executive officer of the Seattle Designer Developer Interaction Group.


Click Here to Register

Thursday, June 4, 2009

Setter Value Binding Helper

A great little Hack in Silverlight, kind of technical stuff for the beginner but a good thing to have down in your professional developer toolbox.

http://blogs.msdn.com/delay/archive/2009/05/07/one-more-platform-difference-more-or-less-tamed-settervaluebindinghelper-makes-silverlight-setters-better.aspx

thanks to karim for this link.

More Simon the Saga

in this latest chapter of simon I have been trying to get 'Simon' to run in a scatterview control on surface to be more 'Surfacy'? [Sir - fa - see]? (new word?) In any case the code from Silverlight Simon to Surface Simon had to have even more hacks... Finally had to convert all the game pads to buttons, hack out the control template and create new event handlers for all 4 buttons. but alas Surface Simon is not available for Download off of codeplex at: http://Simon.codeplex.com/

Also to get around the sound issue with WPF... which I must say the fact that the media element is so lame in WPF as opposed to Silverlight is very very sad. Anyway I changed the PlaySound method of Simon to look like this:


#if Silverlight
Uri MediaItem = new Uri(SoundFile, UriKind.RelativeOrAbsolute);
SimonSounds.Source = MediaItem;
SimonSounds.AutoPlay = true;
SimonSounds.Play();
#else
MediaPlayer mplayer = new MediaPlayer();
mplayer.Open(new Uri(SoundFile, UriKind.Relative));
mplayer.Play();
#endif

you'll note the use of precompiler specifiers and that we are not using the Xaml based media element in the WPF/Surface versions any more...