(a guest post by
Ryan Davidson and chapter 3 of Hacking Silverlight)
First of all, we should probably explain what Codeplex is.
Codeplex.com is a collaborative website where individual contributors create, maintain, contribute, and share code samples for various Microsoft technologies. In this chapter, you will get a brief introduction to some of the open source tools that everyone should know about. These projects include design tools, development tools, libraries and toolkits, back-end and server-side technologies. They include samples of best practices by some of the most accomplished Silverlight users today. These projects showcase people hacking Silverlight in new and interesting ways.
It’s important to note that all of these projects are open source, created by people who have a desire to help the overall Silverlight community. If you find the projects useful, take some time to contribute, or better yet, start your own. Codeplex is waiting. First up, it’s infectious, it’s compelling, it’s the MVVM fever and it’s time for you to break out of your pedestrian design patterns.
MVVM Light Toolkit…“MVVM is so hot right now!” Pardon the Zoolander reference, but it does seem appropriate as an introduction to MVVM due to the incredible popularity and overall buzz around the Model-View-ViewModel design pattern within the Silverlight community.
So what is MVVM? We could easily, and others already have, dedicate an entire book to answering this question, so I’ll just skim over the details and say that MVVM is a architectural pattern that helps developers create applications that are cleaner, easier to maintain and extend, and also highly testable. It’s a variation on the Model-View-Controller pattern that takes advantage of the rich data binding capabilities of Silverlight. The ultimate goal of MVVM is creating a development workflow with true separation between the user experience layer (View) and the programming or business logic layer (ViewModel). Or more simply, you can work on and test either the front end user experience or the back end logic without having to worry about what the other half is doing.
MVVM is just a pattern, all the toolkits (including MVVM Light), classes, and frameworks are just helpers to expedite your implementation of the MVVM pattern. The power of MVVM is really in the rich data binding. Let’s take a moment to look at the data binding syntax in XAML and the C# code behind with a basic TextBlock control.
<textblock text="{Binding Welcome}">
public class MainViewModel : ViewModelBase
{
public string Welcome
{
get{ return "Welcome to MVVM Light";}
}
public MainViewModel(){ }
}
What is happening is the TextBlock has a Dependency Property of a Text value. That value is bound to public Welcome property inside the MainViewModel class. This value of Welcome is determined at runtime. What this gives us is a way to determine the value of a property based on multiple inputs including, user defined preferences, resources, styles, or data binding. The beauty of data binding is that if a property changes in either the ViewModel or the View the data remains bound to the Dependency Property and will update both visibly in the View and in ViewModel data objects accordingly.
How does this binding work? There is a lot of magic that Microsoft has set up and tested for us already. All you really need to know is that you need to set up the Welcome property to use the INotifyPropertyChanged event. Then whenever the property changes it raises the property changed event to all objects bound to that property. Those objects can be set up to handle the event and update properties accordingly.
How do you bring the View and the ViewModel together? First you’re going to create a new XAML prefix in your App.xaml:
xmlns:d="http://schemas.microsoft.com/expression/blend/2008"
xmlns:vm="clr-namespace:MvvmLight2.ViewModel"
Then set up your MainViewModel as a data source within your Silverlight Application.
<application.resources>
<?xml:namespace prefix = vm />
<vm:mainviewmodel key="MainViewModel" isdatasource="True">
</vm:mainviewmodel>
</application.resources>
Then in your MainPage.xaml you can set the DataContext of your UserControl to your View Model.
<?xml:namespace prefix= [default] http://schemas.microsoft.com/winfx/2006/xaml/presentation NS = "http://schemas.microsoft.com/winfx/2006/xaml/presentation" />
>usercontrol class="MvvmLight2.MainPage" xmlns="http://schemas.microsoft.com/winfx/2006/xaml/presentation" datacontext="{Binding Main, Source={StaticResource Locator}}">
</usercontrol>
Now all the child elements of your UserControl inherit the data context of your ViewModel and can be bound do any data exposed in the ViewModel using the Binding syntax we mentioned earlier.
Another very useful benefit of MVVM is Blendability. Blendability is the ability to consume and design against your ViewModel data within Expression Blend and Visual Studio 2010 visual designer. You can use the ViewModel data to design against which can greatly inform your user experience design. The beauty of an MVVM application is that you can see your data inside Blend.
The MVVM Light Toolkit was created and is lovingly cared for by Laurent Bugnion with the ultimate goal of creating an approachable version of MVVM. I say approachable because only the most essential components are included. Don’t call it, "dumb down", it’s just streamlined. All the power is there. The goal of the MVVM Light Toolkit is to "break the monotony" of writing all the standard code and allow you to build your whole application rapidly. Another benefit of the MVVM Light toolkit is that the code works the same in WPF and Silverlight (with a few small exceptions). Plus, since this works in Silverlight it means it will work on the Windows Phone 7 as well.
The installer on Codeplex is packaged as a MSI installer. Follow the installation instructions to set up the necessary elements. Once the install is complete you can create a new Silverlight project type called MVVM and the base MVVM components will be in place ready to use.
MVVM Light Toolkit Version 3 SP1 was release in March 2010 with some great new additions including templates for the Visual Studio 2010 and Blend 4 including a Windows Phone 7 template. There are two DLLs in the install; one is called Essentials which includes RelayCommand, ViewModelBase and others including Commands, RelayCommands, Messaging and much more, the other is called Extras which has more useful elements including; EventToCommand which is a behavior (we’ll learn more about behaviors later in this chapter). EventToCommand allows you to bind any event on any framework element to any command. This removes the annoying restriction of Silverlight and WPF that required you to only bind on a Button based element’s click event.
One final note on performance, MVVM Light Tooklit, as with all open source projects is constantly being optimized. The Databinding elements that MVVM relies on have been heavily optimized by Microsoft and should have little impact on your overall application performance. This is something to consider when thinking about using MVVM for your application.
To read full installation instructions, find additional resources, and of course, download the current source code visit the Codeplex project at
http://mvvmlight.codeplex.com/.
Another critical Codeplex project for developing in is the Silverlight Toolkit.
Silverlight ToolkitUser interface made awesome!
When a new version of Silverlight is released it comes with a set of included elements including controls, templates, themes, samples, etc. The Silverlight Toolkit is an open source project sponsored by the Microsoft Silverlight product team where developers can contribute, enhance, and ultimately use the hottest new controls in Silverlight without having to wait for the next version of Silverlight to be released.
One of the most valuable aspects of the Silverlight Toolkit is the iterative development model. Controls are developed over time and constantly receive valuable feedback from the community. As controls are developed they fall into one of four Quality Bands: Mature/SDK, Stable, Preview, and Experimental. These controls can make creating otherwise tricky or cumbersome user interface elements a snap. The tools have been created in response to a need for a common set of user interface scenarios. Rather than hacking together a user control from scratch by yourself, this project puts the community to work for you.
In addition to helping to create great functionality with controls, you have to make things look good. You knew that right? Anyway, that leads me to another very powerful feature of the Silverlight Toolkit controls, themes. Themes are the visual styles that you can apply to any control. If your application has a certain look and feel, or you have some brand guidelines you have to follow, you can use one of the included themes or break it open and modify it to match. Once your theme is created you can save it as a resource and apply it to everything inside your Silverlight application with a few clicks in Blend. Yeah, it’s that powerful.
Getting started with the Silverlight Toolkit is easy. You download a single Windows Installer package, which does all the heavy lifting for you. It will install all the components on your system so you can get started right away using the new controls and themes in Blend or Visual Studio.
Open up a new project in Expression Blend 3 and under the Assets tab you’ll see a list of new Controls that you can use.
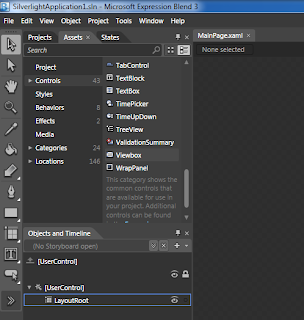
Figure 3.1A – Toolkit in Blend
You can learn more about Silverlight Toolkit and the controls included at
http://www.codeplex.com/Silverlight.
Now that you have your interface data bound and stylized, it’s time to explore how we can use those control elements to present content with the Silverlight Media Framework.
Silverlight Media FrameworkHave media, we’ll serve! The Silverlight Media Framework (SMF) gives media producers all the tools they’ll need to serve up amazing quality content using Silverlight and IIS Smooth Streaming.
As bandwidth pipes open up and high speed internet connections proliferate more and more users expect the highest quality content delivered quickly wherever they are. In the past that was a Catch 22. You couldn’t deliver high quality content without your user having to wait for lengthy downloads or you could get your content quickly but at a lower quality. Those days are gone. With IIS Smooth Streaming the server knows how fast the connection is and scales the quality of your content accordingly. It’s such a simple idea but it has taken years to finally hit the main stream.
What SMF offers you is a complete set of tools to prepare, encode, and deliver your content anywhere using Silverlight. SMF is still in its infancy, but it already has some very high profile implementations including the 2010 Vancouver Winter Olympics. Smooth Streaming alone not enough to convince you to use Silverlight? Well, Smooth Streaming is just one of the multiple tools included in SMF. There are also DVR type controls, logging, with future releases planning to implement advertising, improved API, better plug-in support and improved accessibility. The future is bright, and in full HD.
The download has all of the necessary DLLs which you’ll need to include in your project solution as resources. In addition, you’ll need to download and install the IIS Smooth Streaming Player Development Kit for everything to work properly. Once you have things set up you can take your content and stream it to the world. You can learn more at
http://smf.codeplex.com/.
Sometimes just serving up high quality video isn’t enough. Lets take a look at how the Silverlight Hyper Video Player is pushing video into the future.
Silverlight Hyper Video Player"Can we do for video what hyperlinks did for text?" -- Jesse Liberty
That is the question that is driving the Silverlight Hyper Video Player (SLHVP) project. There is a lot of video available on the web these days. The subject of these videos can be simple entertainment like a dog riding a skateboard or complex like a college lecture on particle physics. Wouldn’t it be great if while you were watching these videos you could learn more about what you’re seeing just by clicking, like clicking a link on a webpage?
Let’s create a quick "for instance". Say you’re watching a TED Lecture and the speaker uses a term you’re not familiar with. With the Hyper Video Player you can click on a link that shows up at that moment in the video. The link takes you to a dictionary definition of that term. Let’s say you are really enjoying the video and don’t want to pause it to look up the term. You can bookmark the link so you can return to it later. These are just two very simple potential user experiences within the Silverlight HVP.
Silverlight has impressive video play back capabilities, but this project is really about taking video to the next level. It’s adding functionality that just hasn’t existed before, and that is what Hacking Silverlight is all about. The theory behind this project is that a video can and should be ‘clickable’ like a web page. It’s just information after all. You should be able to link related content to any moment of any video to create a richer, more engaging experience for your users.
One of the best parts of the Silverlight HVP project is the training materials being developed to teach about Silverlight HVP are using Silverlight HVP to deliver it. Nothing speaks better about a technology than using it to promote itself.
So how does one go about creating content for the Silverlight HVP? First of all, you will need some video. You’ll need to set up meta data and key frames that correspond to information inside the video. Then it’s time to let the project come to life. When you play back your media you’ll notice call-outs, links, and summaries all appearing as the video plays. It’s the ultimate in enriched user experience and the potential for this technology is amazing.
Getting started is easy. Version 1 of the SLHVP project was released in March 2010. The download is a project solution with full source code. Open the project and you’re off. Visit
http://silverlighthvp.codeplex.com/ to download source code and start watching some Silverlight HVP enabled mini-tutorials.
Let move away from video in Silverlight and take a look the next frontier, Silverlight games.
Farseer Physics and Physics HelperWant to make a game? Want to use physics in that game? Enter Farseer Physics and Physics Helper, the ultimate in Silverlight physics. In the real world, just like in programming, objects have properties. Properties like mass, inertia, velocity, etc. When objects interact in the real world these properties affect each other, and what Farseer does is give you these "real world" properties inside Silverlight.
Sometimes all you want to do is have two balls bounce around the screen. Well instead of having to figure out all the complex calculations between object properties, you can plug in Farseer Physics and you’re off. Farseer physics does have one limitation, it only supports 2D. Once you use it, however, you won’t mind that it’s only 2D, trust me!
So let’s talk about Physics Helper for a moment. Physics Helper takes the Farseer Physics engine and packages the most common physics computations into Behaviors. I’ll talk more about behaviors in the Expression Blend section below. Just know that the Physics Helper is a huge time saver when building any game that requires physics. You can learn more about Physics Helper at
http://physicshelper.codeplex.com/.
To apply the physics to your application you will need to set up a PhysicsControllerMain. This will let Farseer know where your "world" is. Once your "world" is created, you can add properties to it like gravity and special collisions. The best part of Physics Helper is that the all the complex math is taking place behind the scenes and you don’t have to worry about it.
PhysicsControllerMain _physicsController = LayoutRoot.GetValue(PhysicsControllerMain.PhysicsControllerProperty) as PhysicsControllerMain;
_physicsController.Simulator.Gravity = new Vector2(0, 500);
_physicsController.Collision += new PhysicsControllerMain.CollisionHandler(_physicsController_Collision);
Finally, all you have to do is register some XAML or other UI elements using the PhysicsObject. This includes them in the "world" and applies all the properties you’ve set up in your world to them.
Ellipse ball = _physicsController.PhysicsObjects["ball"].uiElement as Ellipse;
Starting to use Farseer is really easy. Many of the available downloads include simple samples. The beauty part is simple samples of physics can scale to any size project. The object forces are the same. Go to a
http://www.codeplex.com/FarseerPhysics and start playing with the samples. It won’t take long before you’re building entire virtual worlds that look and function like the real world. Neo and Morpheus will be so proud!
Balder 3dSilverlight is a very powerful platform for all sorts of content presentation experiences including games. However, Silverlight does not offer rich 3D capabilities out of the box. Integrating or creating your own 3D engine can be a serious undertaking and thankfully the Balder 3D project is breaking through 2D barriers to implement true 3D in Silverlight.
Balder was created by Einar Ingebrigtsen and is described as a "Managed Game Engine with both 2D and 3D support targeting Silverlight, XNA and OpenGL." That’s right you don’t need to use Silverlight, but currently it’s a great platform to develop games in.
You can use Balder in two ways. One, you can download the DLLs, include them in your project solution as resources and get started leveraging Balder’s core feature set right away. Two, you can download the Balder source files and get your hands dirty exploring the guts of a complete managed game engine.
Implementing the Balder engine in Silverlight is very simple. Once you have all your resources you just need to add the Execution namespace illustrated below and you Execution:Game object has the core features ready to hook up in your code behind. Inside the Execution:Game object you can add your 3D meshes, light sources, and a camera for true 3D effects.
<usercontrol class="Balder.Silverlight.SampleBrowser.Samples.Events.Mouse.Content" xmlns="http://schemas.microsoft.com/winfx/2006/xaml/presentation" x="http://schemas.microsoft.com/winfx/2006/xaml" execution="clr-namespace:Balder.Core.Execution;assembly=Balder.Core">
<grid name="LayoutRoot">
<execution:game width="800" height="600">
</grid>
</usercontrol></execution:game>
Once you’ve downloaded the DLLs you can include them as resources in your project. You can add Physics to your 2D and 3D models easily with the Farseer Physics engine which I will talk more about in the next section. Head to
http://balder.codeplex.com/ to get the latest source code and see some samples in action.
The projects we’ve highlighted so far have talked about how to create rich data binding, stylized controls, rich media delivery and an outstanding game environment. Now we’re going to talk about a project that will make creating all of these easier, Behaviors!
Expression Blend – Behaviors LibraryHave you ever had to develop an interface? Expression Blend is your friend. It’s a huge time saver when creating visuals for Silverlight, plus it has some incredible features to help you develop Silverlight applications faster. Besides the graphics capabilities, Blend offers a rich XAML editing view, a unique Storyboard driven animation layout, and many more features. What we’re really interested in here are the features you probably haven’t heard of. Let’s start with behaviors.
Behaviors save time, which, be honest, you don’t have enough of. This Codeplex project will introduce you to some of the most useful behaviors already included and ready to use in Expression Blend. That’s right! You just need a default install of Expression Blend to take advantage of behaviors.
If you’re one of those "afraid of code" types, Blend has your back and behaviors are your best friend. You can think of behaviors as drag and drop code. You can work in a design view and add functionality to your elements just like dragging a file from one folder to another. You want this button to start a video? Use a behavior. You want this little ball you created to bounce around the screen? Use a behavior. It’s so simple it’s scary, like some magic voodoo hamster is inside your computer making everything just work.
Do you have a specific visual effect that you’re trying to re-create and you can’t find it within Blend? Take a look at the Effects library, also part of the Codeplex project. There are lots of visual effects you can use such as motion blur, bloom, gray-scale, and more are being added all the time.
Now, conversely, let’s say you’re one of those "I need to code everything myself" types. Behaviors still give you plenty to get your hands dirty. You can build customized behaviors in Visual Studio. You can also use the Effects library as a template for creating your own custom Effects with Pixel Shaders.
The installer package available on Codeplex will put all new elements directly into your Blend Library and they will be available to use the next time you start up Blend. Now go play!
http://expressionblend.codeplex.com/.
Earlier we talked about Silverlight 3d but if you’re really hard core and maybe doing a bit of XNA on the side then this might be your thing…
Silver SpriteSpeaking of play; let’s talk games! How would you like to build once, play everywhere? Silver Sprite gives XNA developers a tool set that allows them to publish their games on the web using Silverlight without making code changes to their game. This is the essence of Hacking Silverlight. With Silver Sprite you can take your code base and run it using Silverlight without having to change virtually any code. XNA is the language that Xbox and Zune games are developed in.
Getting your game prepared to run in Silverlight takes essentially only two lines of code. Create a new Silverlight project. Then add all your game resources into that project. In the Main XAML page add a game namespace which references your project and a game class object to a canvas. That’s it.
xmlns:game="clr-namespace:MyGame
<canvas>
<?xml:namespace prefix = game /><game:game1 name="game"></game:game1>
</canvas>
Believe me, being able to port games from platform to platform that easily without making code changes is the holy grail of development hacks. Every developer, including you, would much rather write code once, and be able to deploy it everywhere. It saves time, money and sanity.
Silver Sprite 3.0 is still in alpha at the time of publication, but it already gives you some great features to port your game to Silverlight. You can easily import and leverage your graphics, fonts, and other game resources simply by adding them to the Silverlight project. Silver Sprite does all the tricky work for you.
Visit the Codeplex project at
http://silversprite.codeplex.com/ to download the DLLs and find examples of Silver Sprite in action.
SummaryThe projects in this chapter are all great examples of making Silverlight work for you. In the truest sense, they are all Hacking Silverlight. The best thing about these projects, and Codeplex for that matter, is that everything you’ll find is open source. The best thing about open source is that there are new projects starting up constantly. These are just a few of the projects that we find useful and we think will inspire you to push Silverlight to the next level. Your next challenge is to take some time and do a Bing search, visit Silverlight community sites and blogs, and of course visit Codeplex.com. There is likely to be some impressive new projects popping up every day. Happy Hacking.


